

A Group Link is a unique link to the survey that can be shared. A Group Link allows multiple surveys to be completed from the one link.
Create Group Links if you don't know the individual participant details or to share the survey with a wide audience. These links can be shared on social media, websites and auto-responders, or sent via email to individuals or influencers to share with their network.
Clicking on a Group Link allows a person to register in a project either anonymously or with their personal details. As people register they become participants in the project and they are added to the list of participants in the project.
In many projects, a single Group Link will be all that is needed.
However, reports can be filtered to include or exclude surveys completed from selected Group Links. So, creating different Group Links may be useful when analyzing the survey results.
In this Article
Adding and Editing Group Links
Viewing and Sharing Group Links
Optional URL Parameters for Deploying via Autoresponders and Mail Systems
Group Links have Multiple Uses
- Posting or embeding surveys on websites or Intranets
- Posting surveys to Social Media
- Sharing surveys via autoresponders (like Mailchimp & Aweber)
- Creating links for Influencers to share with their networks
- Give links to people to share or distribute surveys personally
Group links support three optional URL parameters. These Parameters are brought forward into the Participant List in the account.
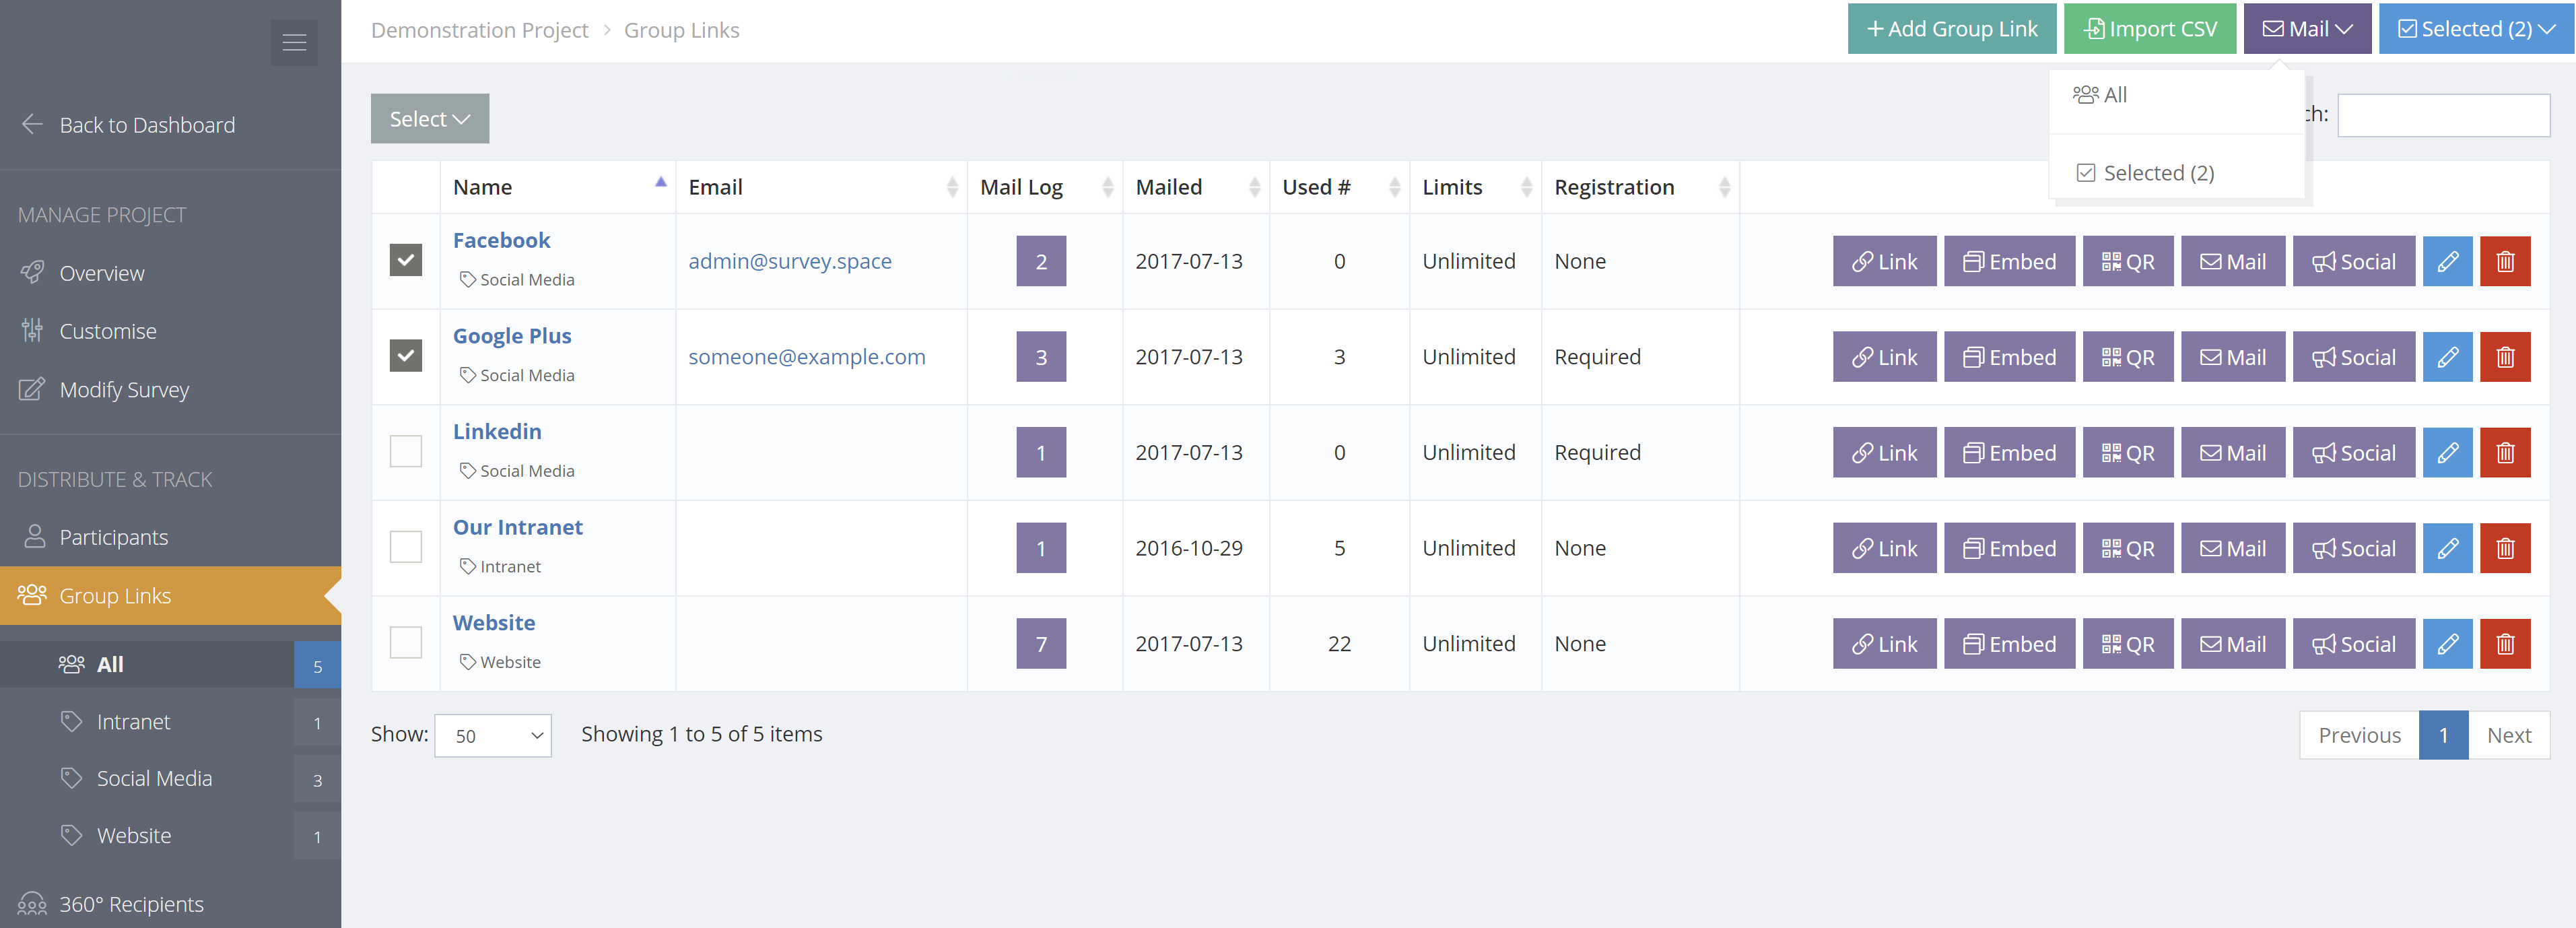
The Group Links Menu
The Group Links menu lists all the shareable links in the project.
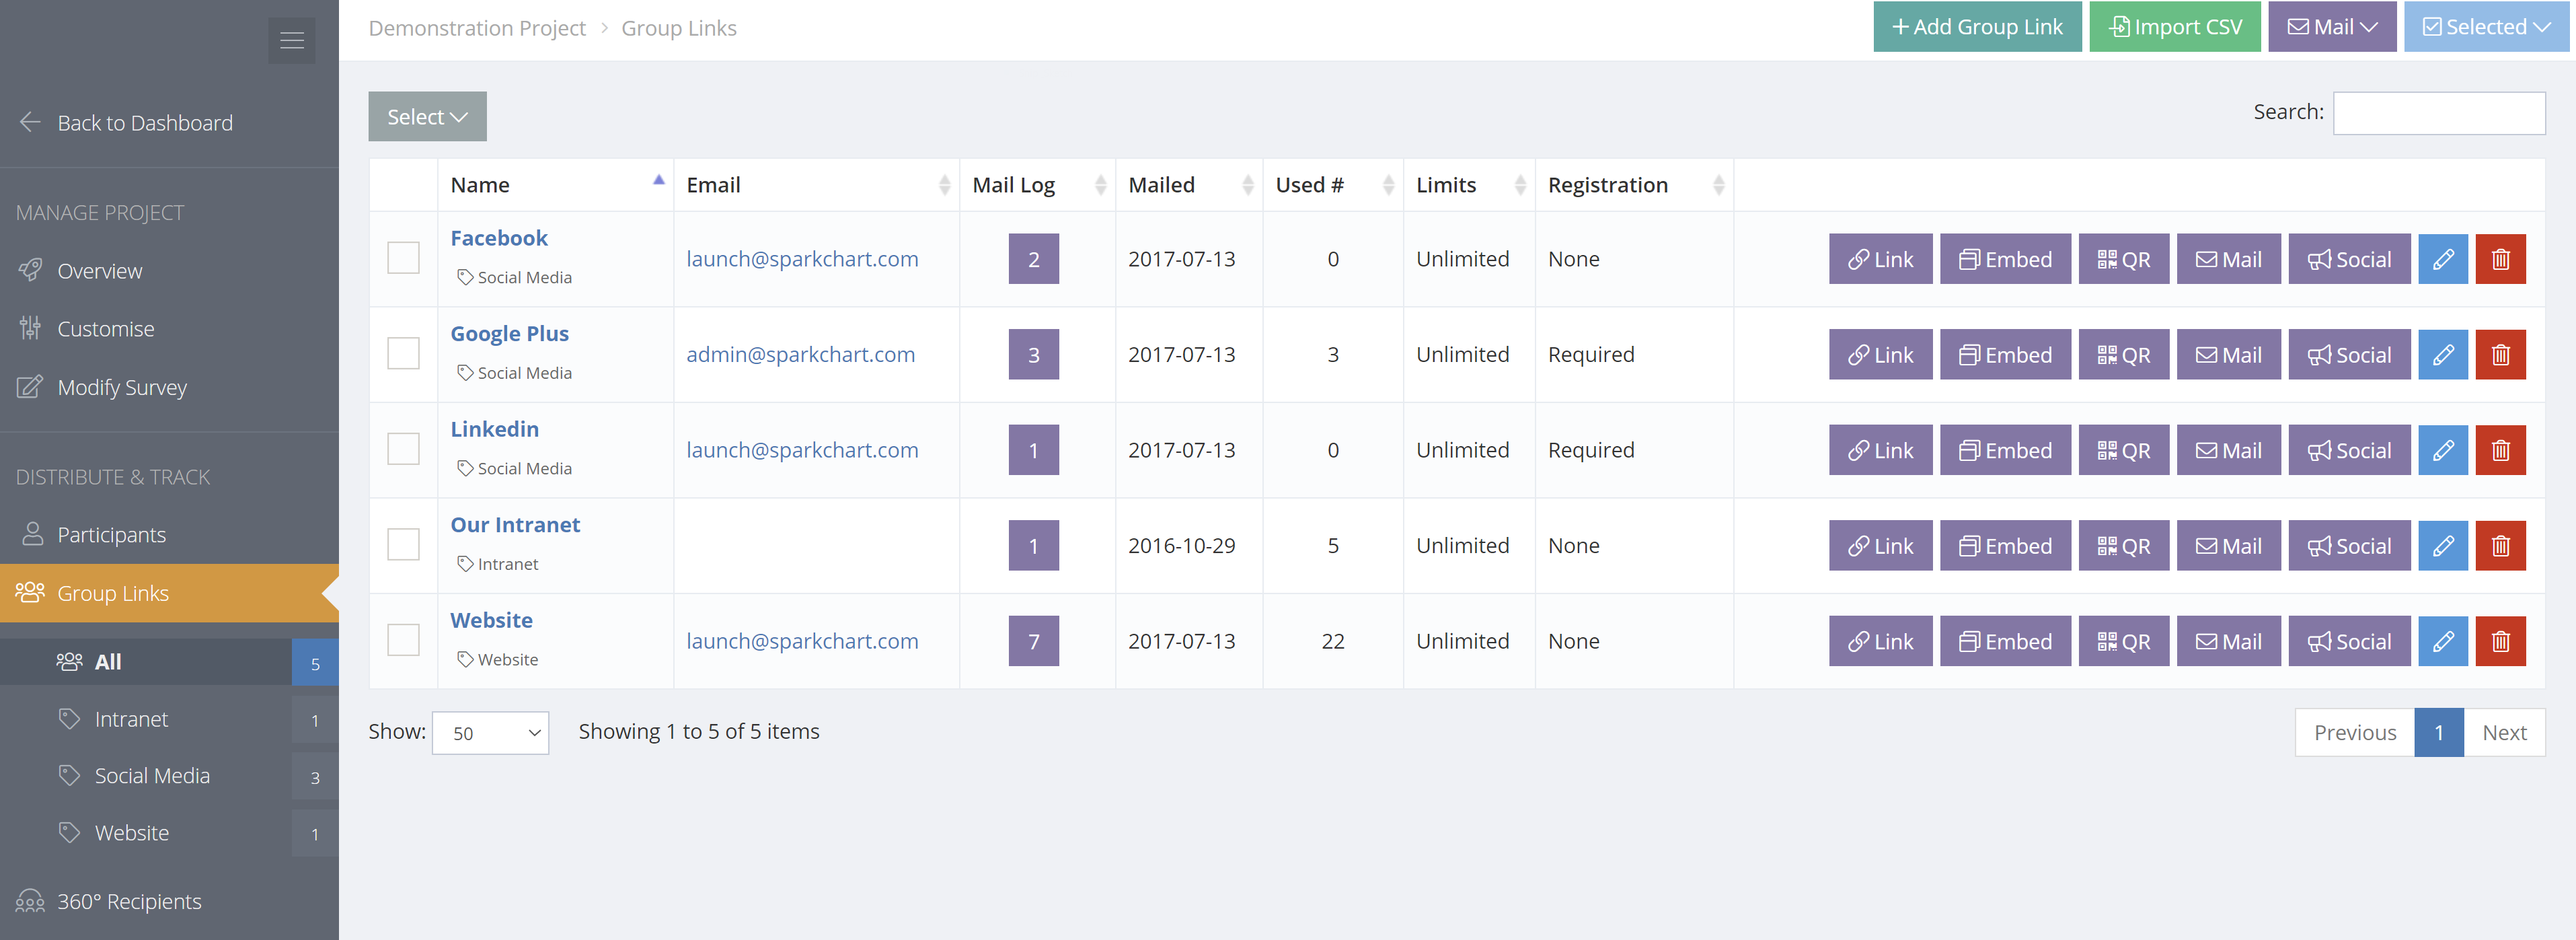
Adding or Editing Group Links
To create a Group Link, select "+ Add Group Link" or "Import CSV" in the top menu. Click the Edit button or the Delete button alongside a Group Link to edit or delete.
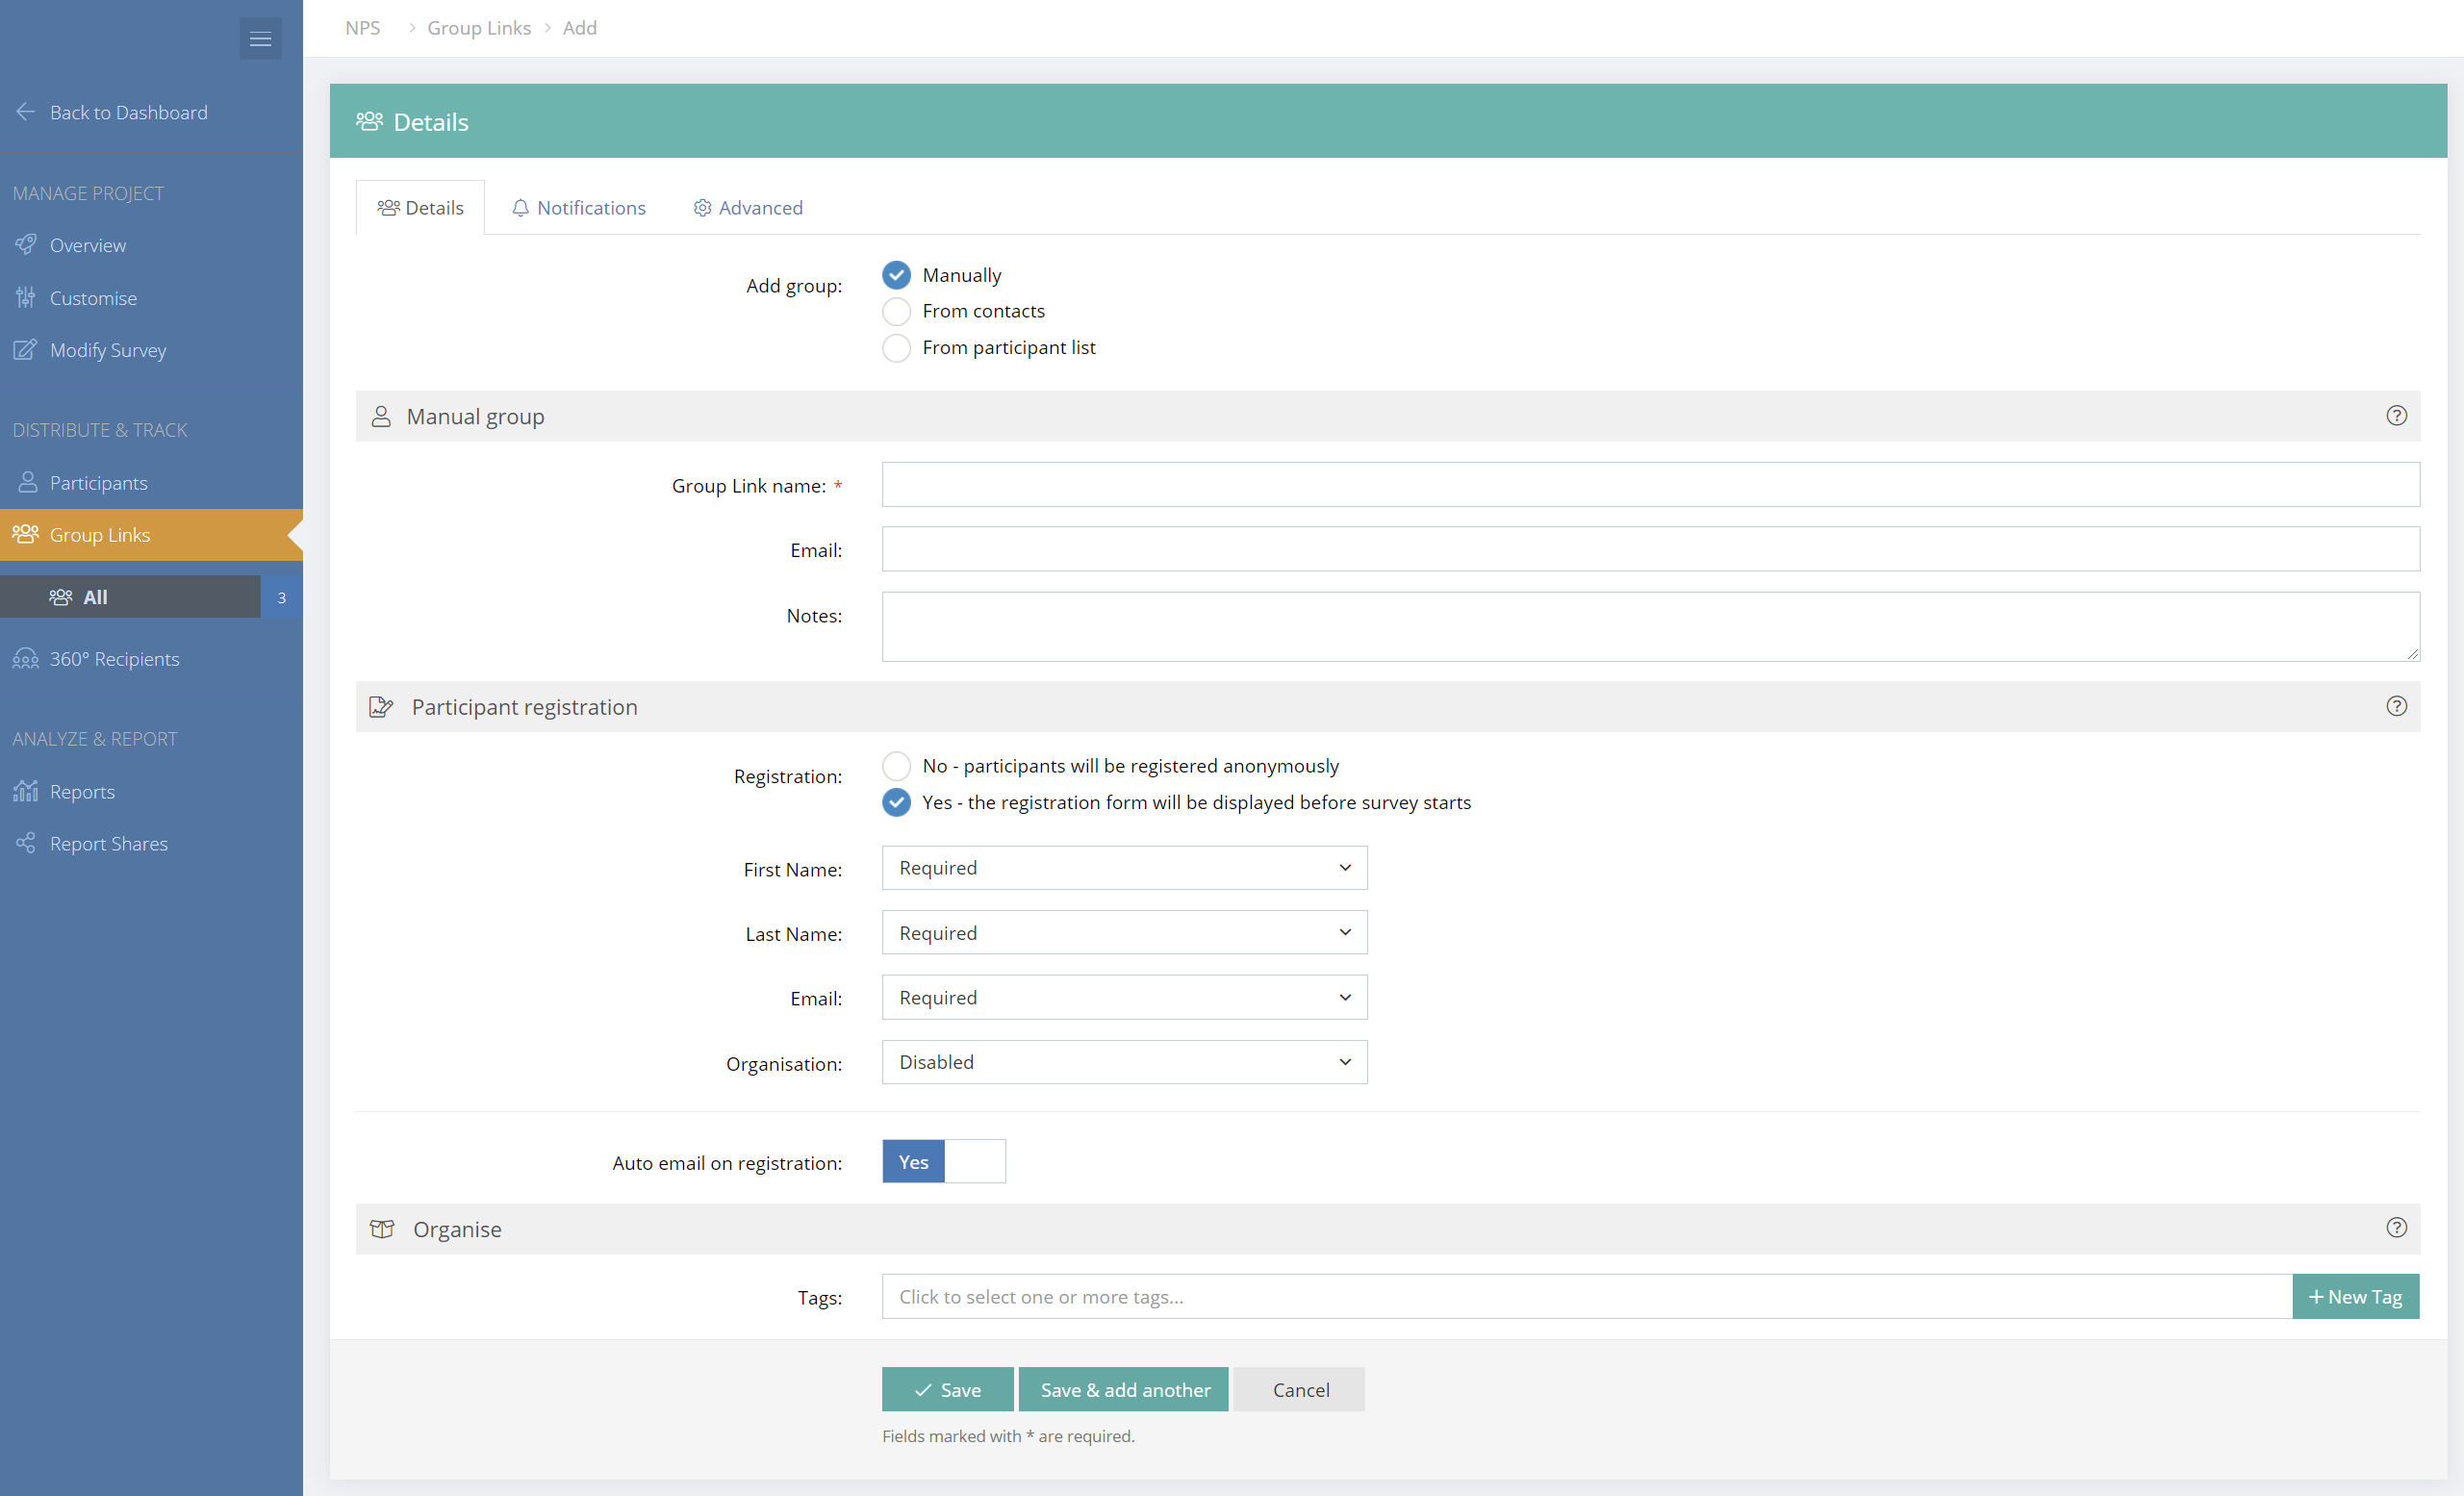
Adding Manually
Manually adding single Group Links is the most common way to create a link. Only the name is required. The other fields are optional. The name and other details are not visible to survey respondents. Multiple Group Links can be useful for reporting as the survey reports can be filtered by selected Group Links.
Add from Contacts, Participant Lists or CSV
Creating Group Links from Contacts, Participant Lists or CSV can be useful when larger numbers Group Links are needed. For example, Group Links may be sent to Influencers. Or you may wish to send Group Links to a mail list so that those people can each share the survey to a wider audience.
Mostly, you would only do this if you want to view separate reports for each link or for collections of links.
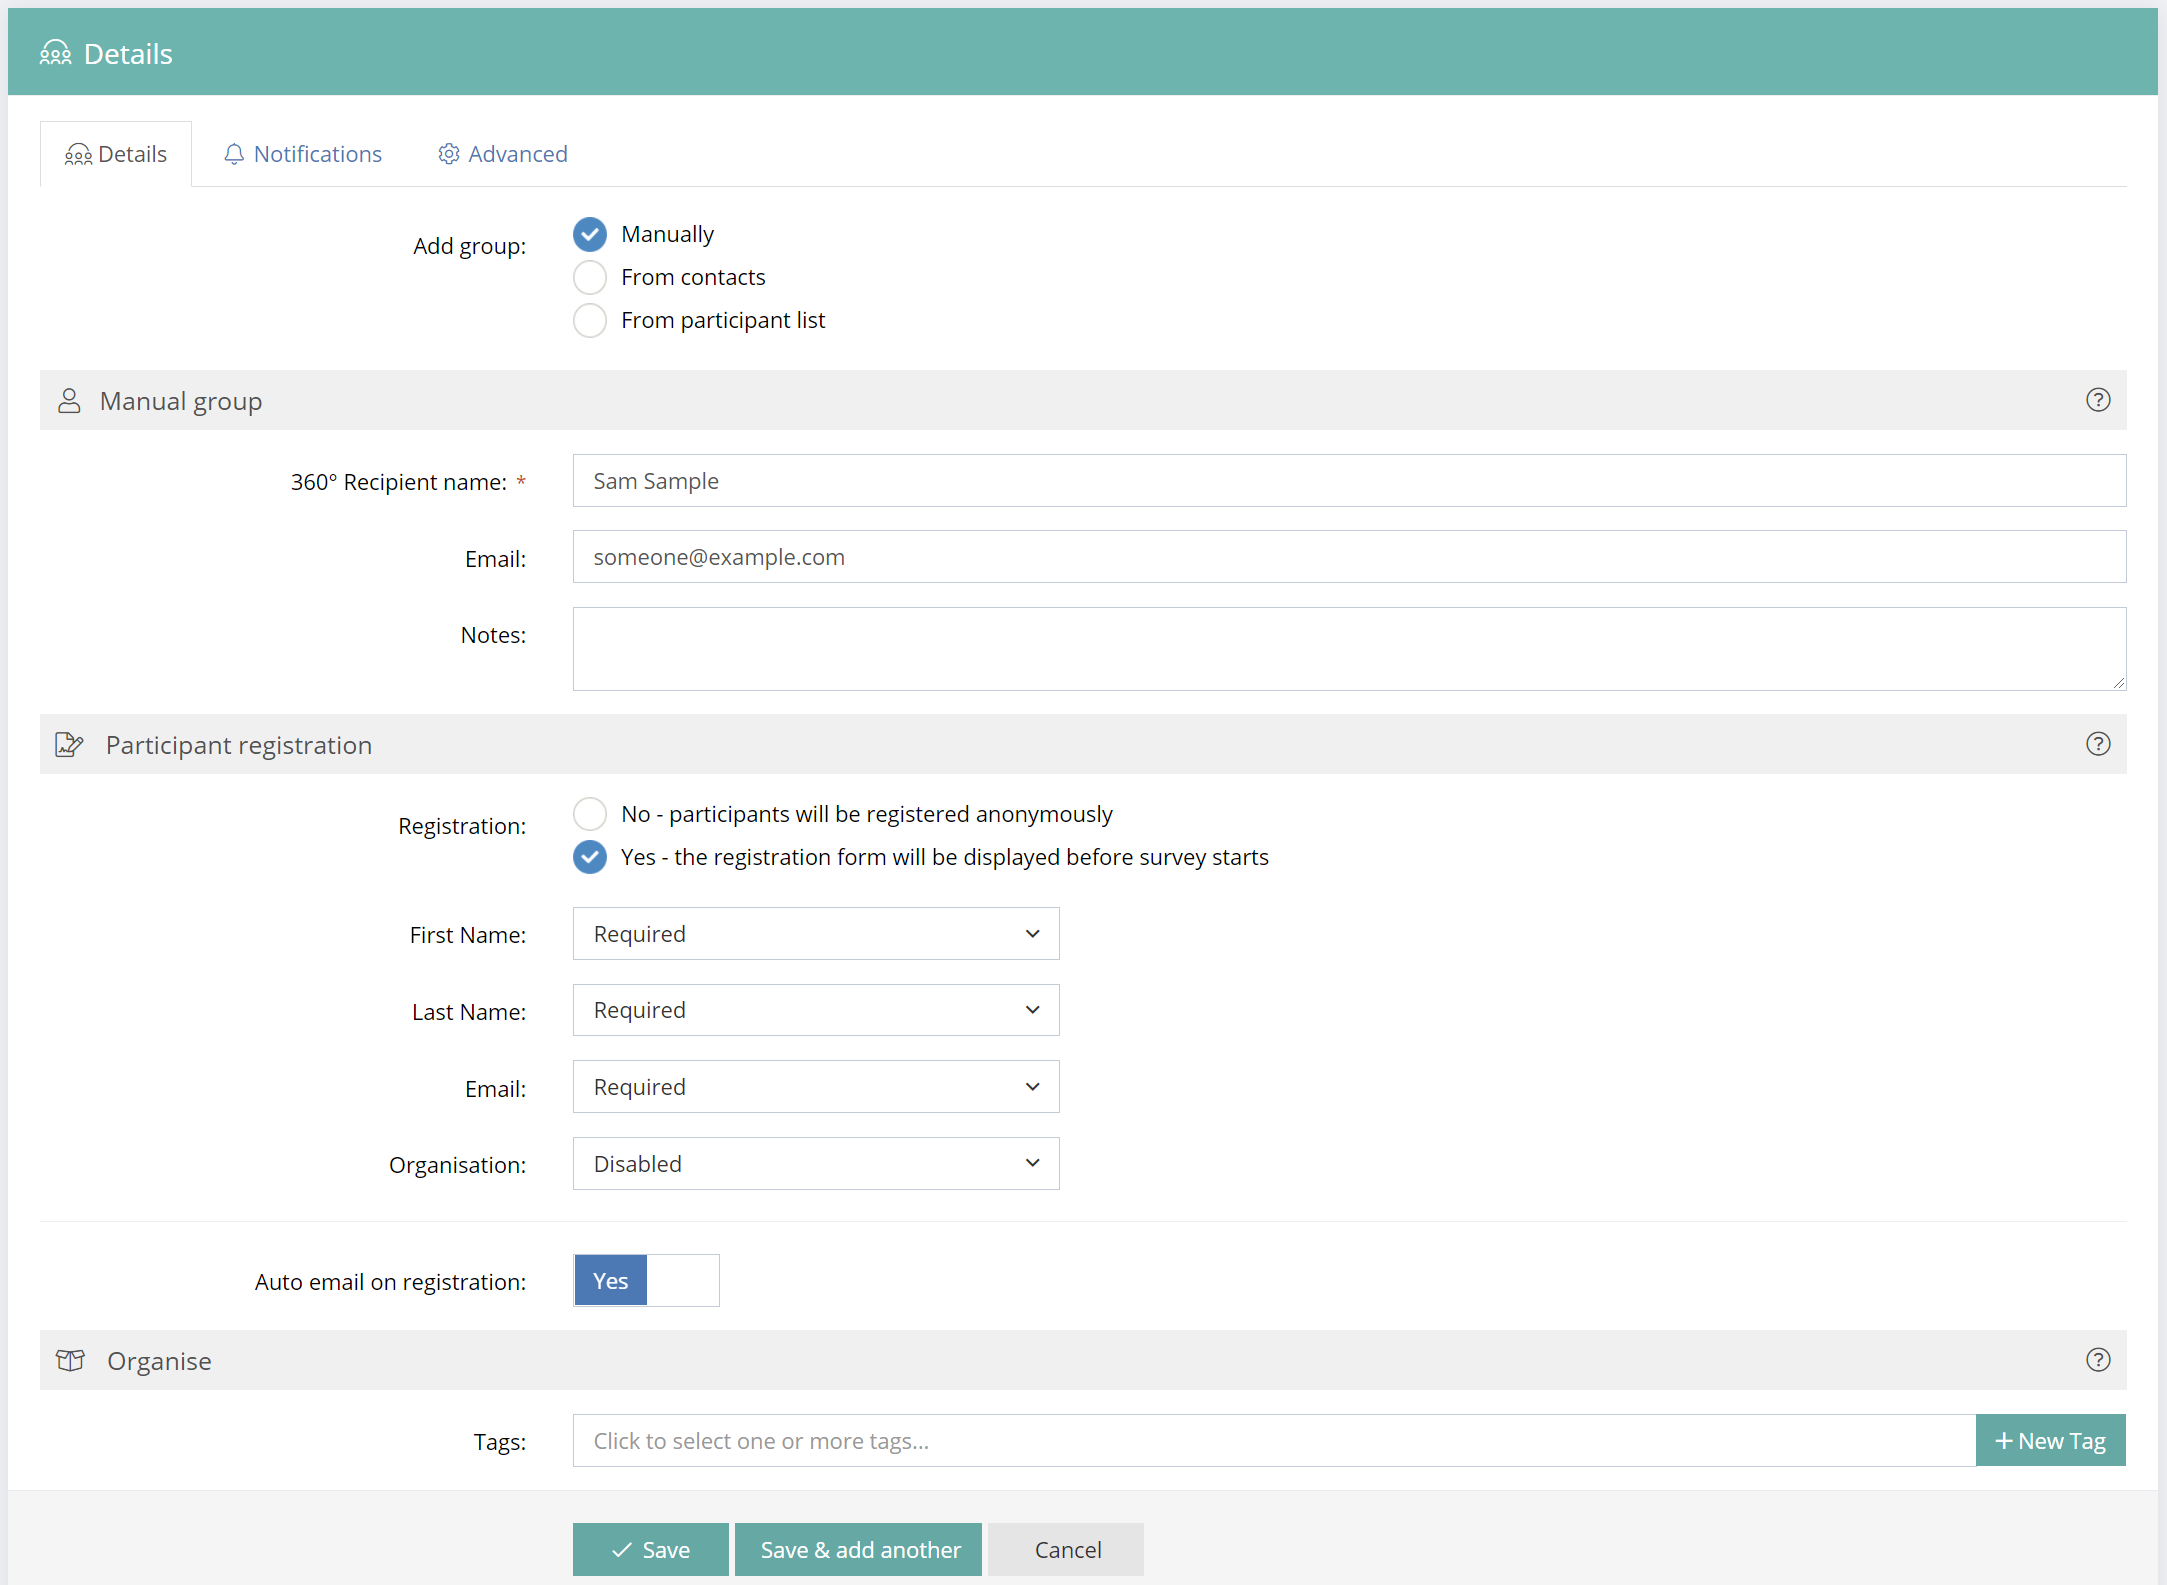
Registration options
When using a Group Link (a shareable survey link) there are several registration options. When the registration form is set to be displayed, each registration field can be set to Required, Optional or Disabled.
The registration fields are:
- First Name
- Last Name
- Organisation
Customised language assets are available from the Manage Project/Customise/Language menu and each field name can also be customised.
Registration Options - Required, Optional or None
If you wish to ask the users who click the Group Link for their details, you may wish to enable a Required or Optional registration. This will display a screen before the survey, asking them for the relevant details.
If registration is set to Required or Optional, an optional email can be sent automatically to the survey participant. The email confirms their registration and provides a link to the survey. This automatic mail can be turned off.
Automatically Email a Survey Link on Registration
If registration is set to Required or Optional, an optional email can be sent automatically to the survey participant. The email confirms their registration and can provide a link to the survey to allow them to continue the survey and submit at a later time. The Mail Template for the automatic email is set in the Customise > Mail menu. Customised Mail Templates can be created in the Dashboard > TOOLS > Mail Templates menu. Mail templates have an option to include Tokens. A Token is a field that will automatically be replaced with an assigned value.
Select the Registration Option when adding Group Links.
Select the mail template for registration.
The mail subject line and message can contain tokens that will be replaced by values that are relevant to the type of survey link. Customising the subject and messages, and using the relevant tokens, is a way to ensure that the survey respondent knows what the email is about.

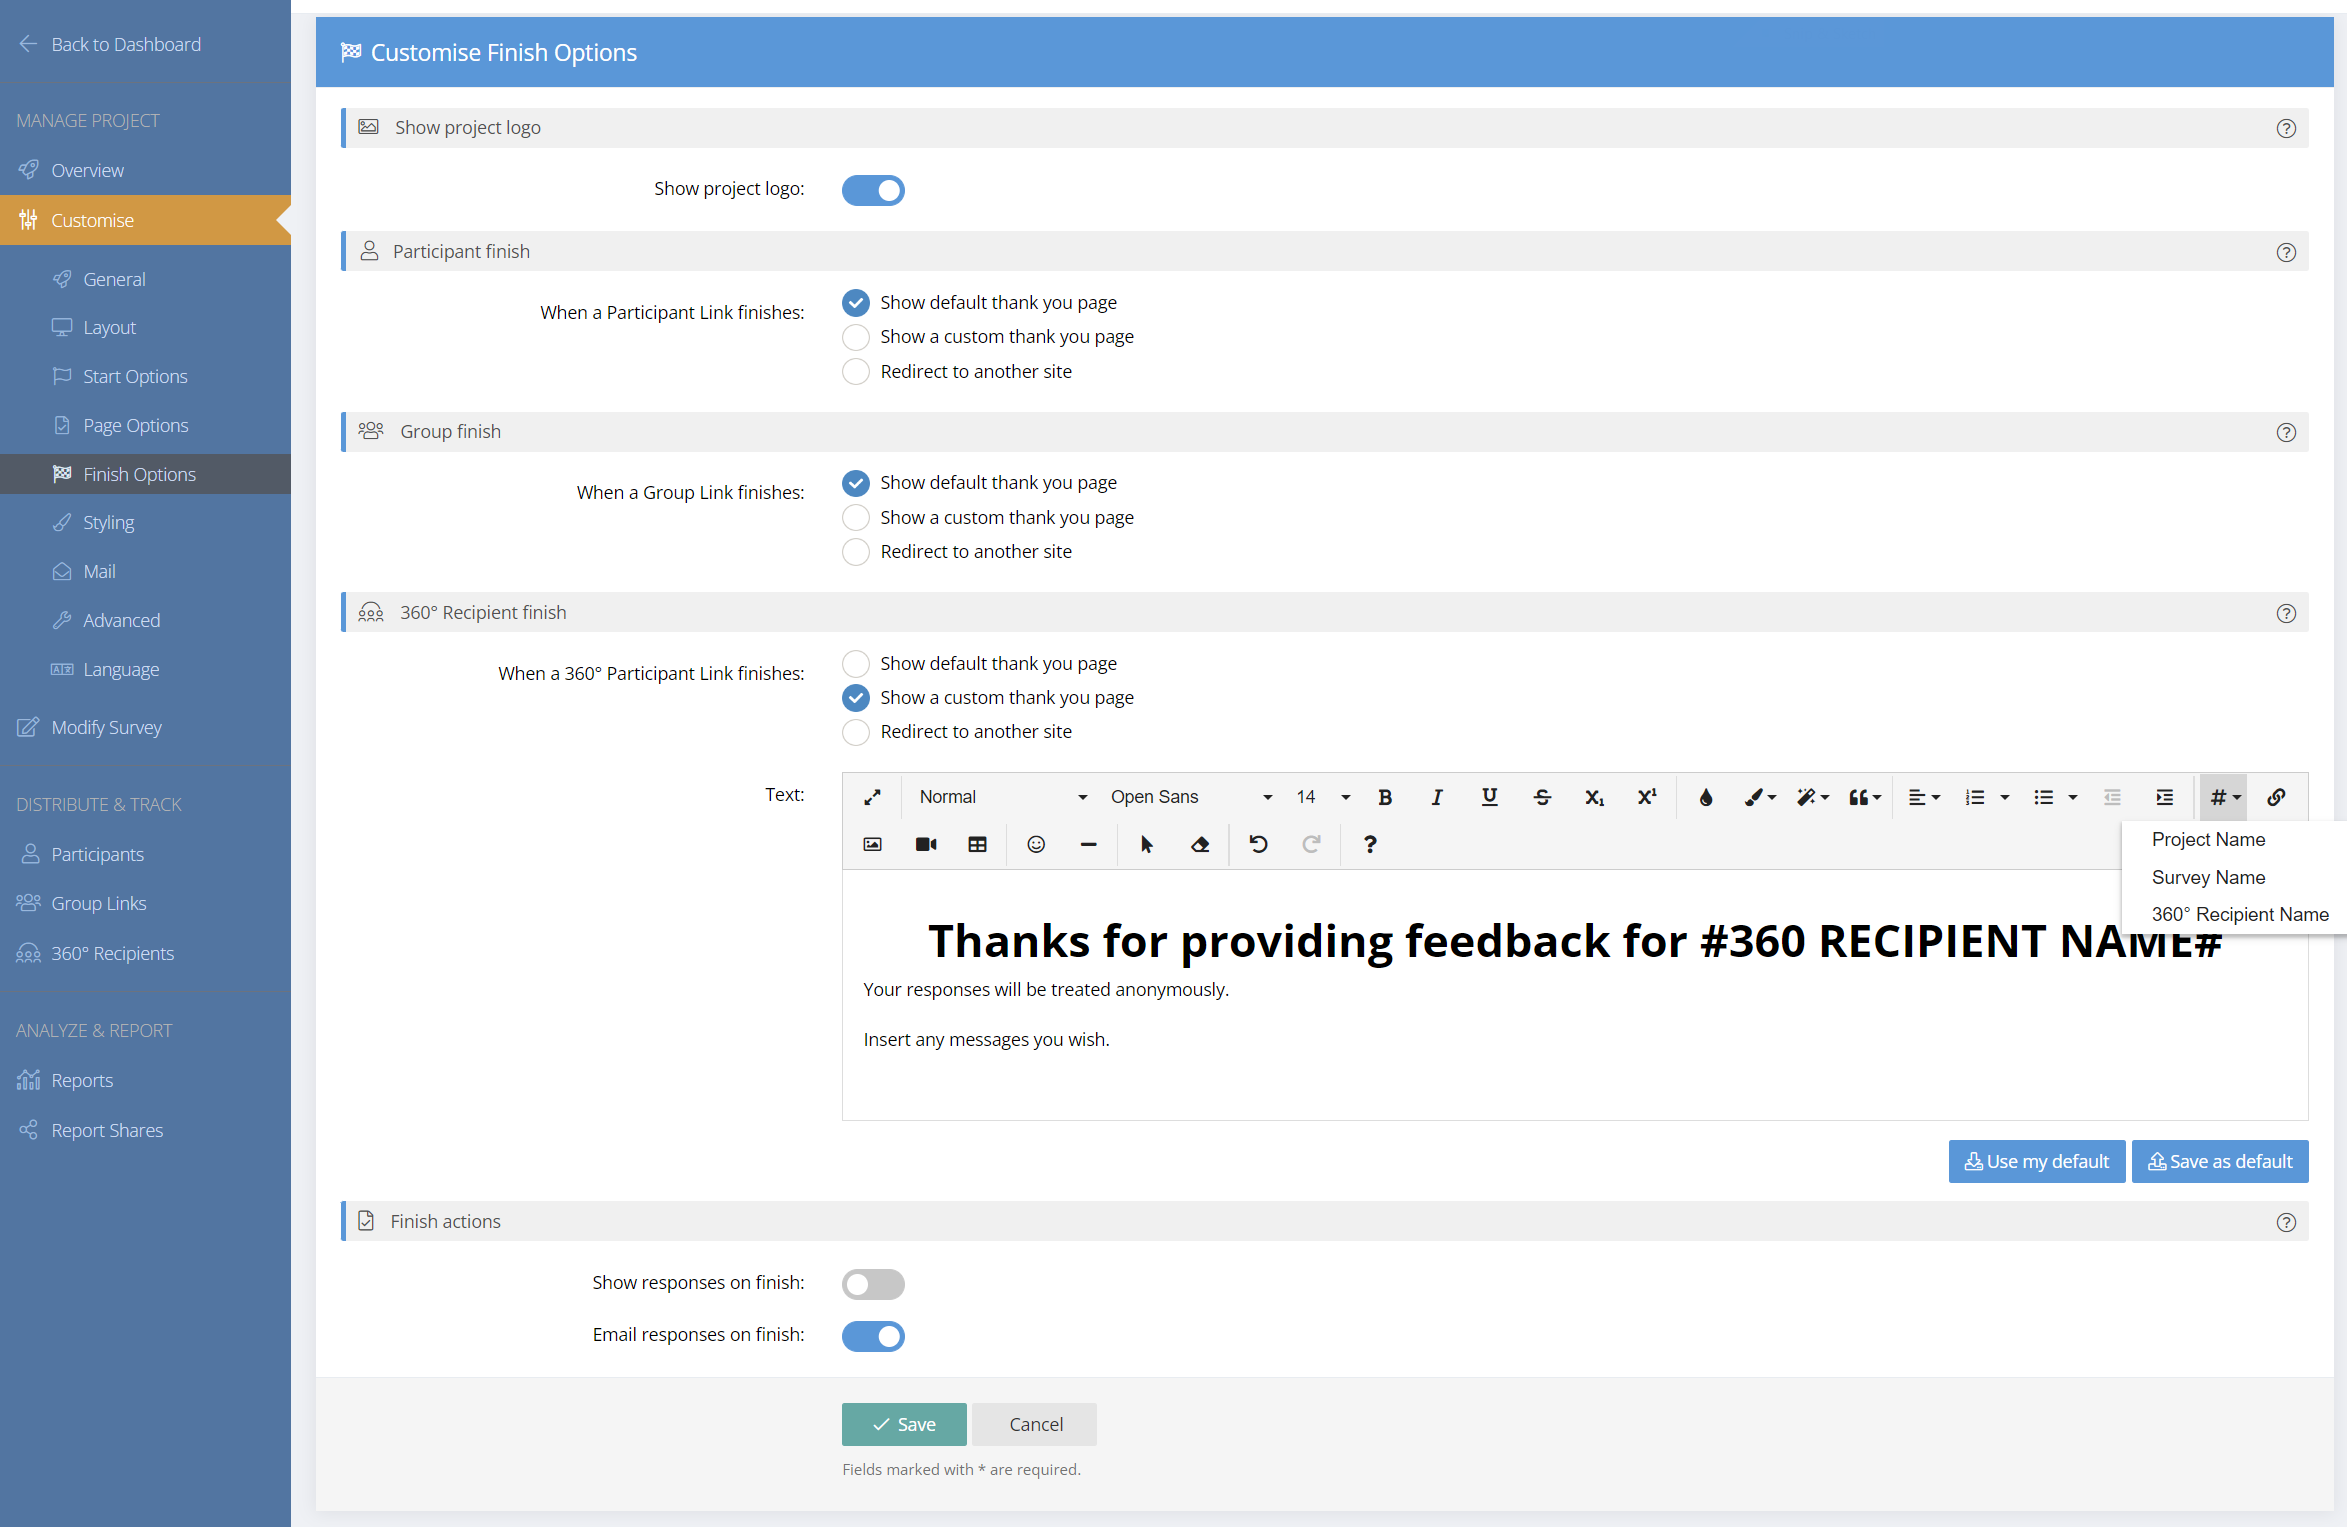
Option to Email Responses
If "Email responses on finish" is enabled in the Customise > Finish Options menu, survey responses will be emailed to the respondent when they submit their survey. You can choose one of your own customised mail templates, or create new ones in the Mail Templates section. Otherwise, if left empty, a generic email will be sent instead. Please be aware that the default email may not contain relevant tokens.
Viewing and Sharing the Group Links
There is a Link button alongside each Group Link. Multiple links can be viewed by clicking the checkbox alongside multiple Group Links and then choosing Selected/Links.
There are also options to generate QR Codes and website Embed Code for the survey links or post the surveys to social media.
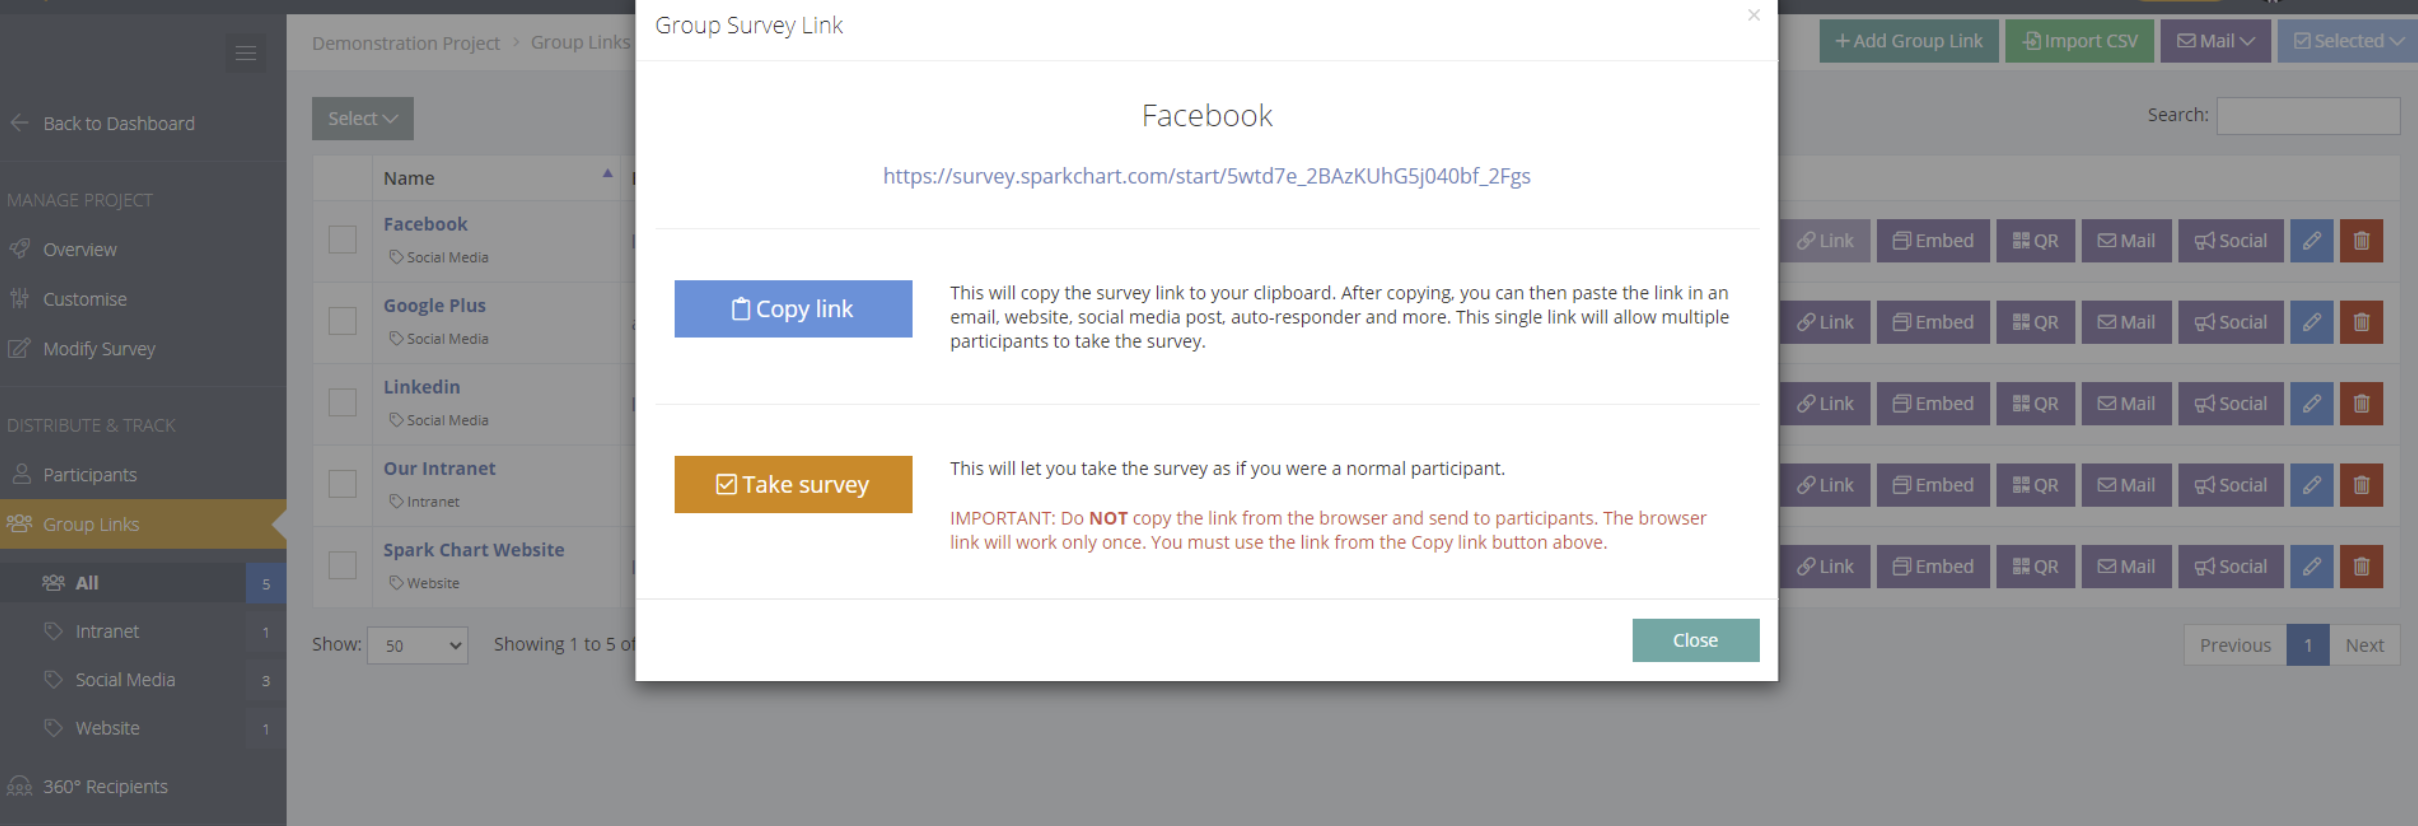
There are two options when viewing Group Links.
Copy Link and Share
This will copy the survey link to the clipboard. After copying, you can then paste the link in an email, website, social media post, auto-responder and more. This single link will allow multiple participants to take the survey.
Take Survey
This will let you take the survey as if you were a normal participant. Do NOT copy the link from the browser and send to participants. The browser link will work only once. You must use the link from the Copy link button.
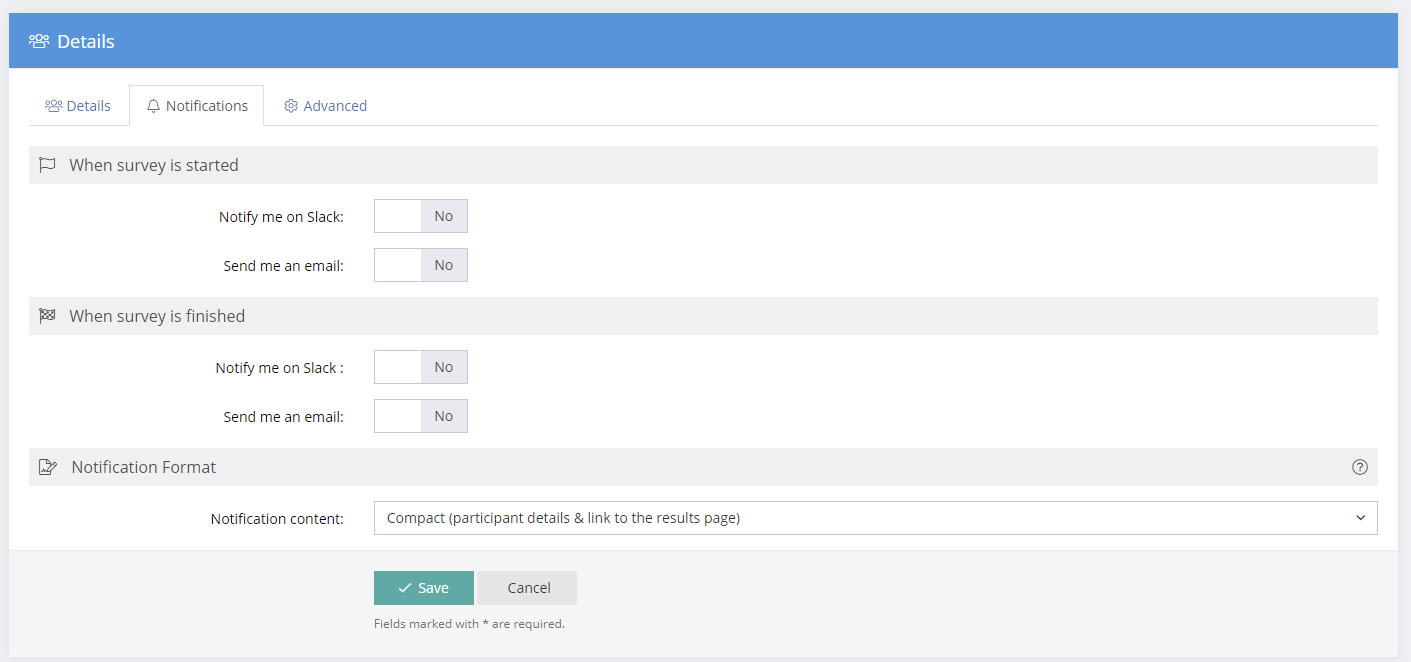
Enable Notifications (with or without Results)
Automatic notifications can be enabled for surveys completed from a Group Link or a Participant Link. When the survey is started or completed an automatic email or Slack notification can be sent.
Set the notification content to either "Compact (participant details & link to the results page)" or "Expanded (participant details, full survey answers & link to the results page)".
Advanced Options
By default Group Links are unlimited. You can define the maximum number of times this link can be used before it is closed. Once a link is closed, no one will be able to use it to take a survey. You can reopen the link any time by increasing the use limit or removing it.
By default, Group Links inherit display elements such as page heading & question title visibility from the main Project options. If you want to override this behaviour (for example when embedding a survey), you can change this here.

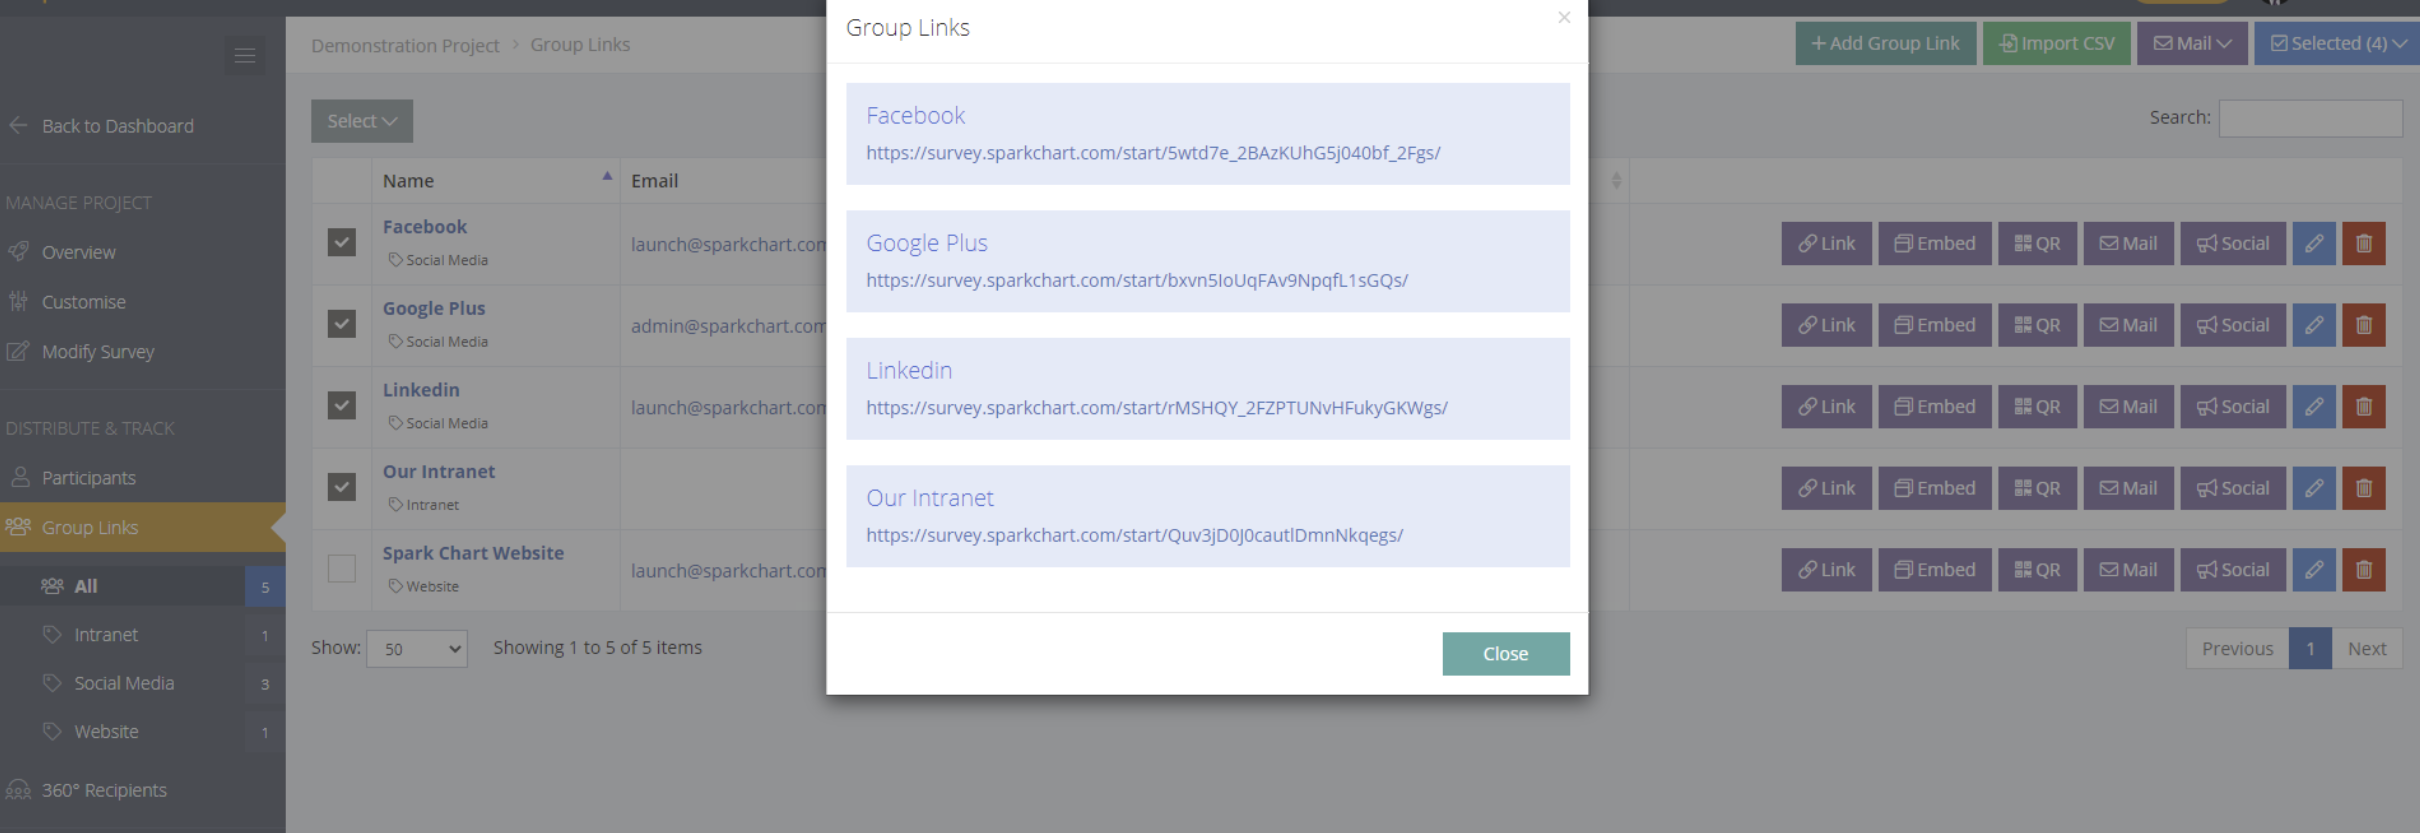
Getting Multiple Group Links
To obtain links for multiple Group Links or 360 Recipient Links, select the Group Links and then choose the "Selected" button and "Links".
Add surveys to websites (embed or with a link and button or image)
Copy the Group Link and then use it on websites as a link, add the link to a button or image, or use the link in an iframe. In the Group Links menu, there is an Embed button alongside each Group Link. The Embed button brings up a form to generate the iframe code to embed the survey on a website or in a website popup.

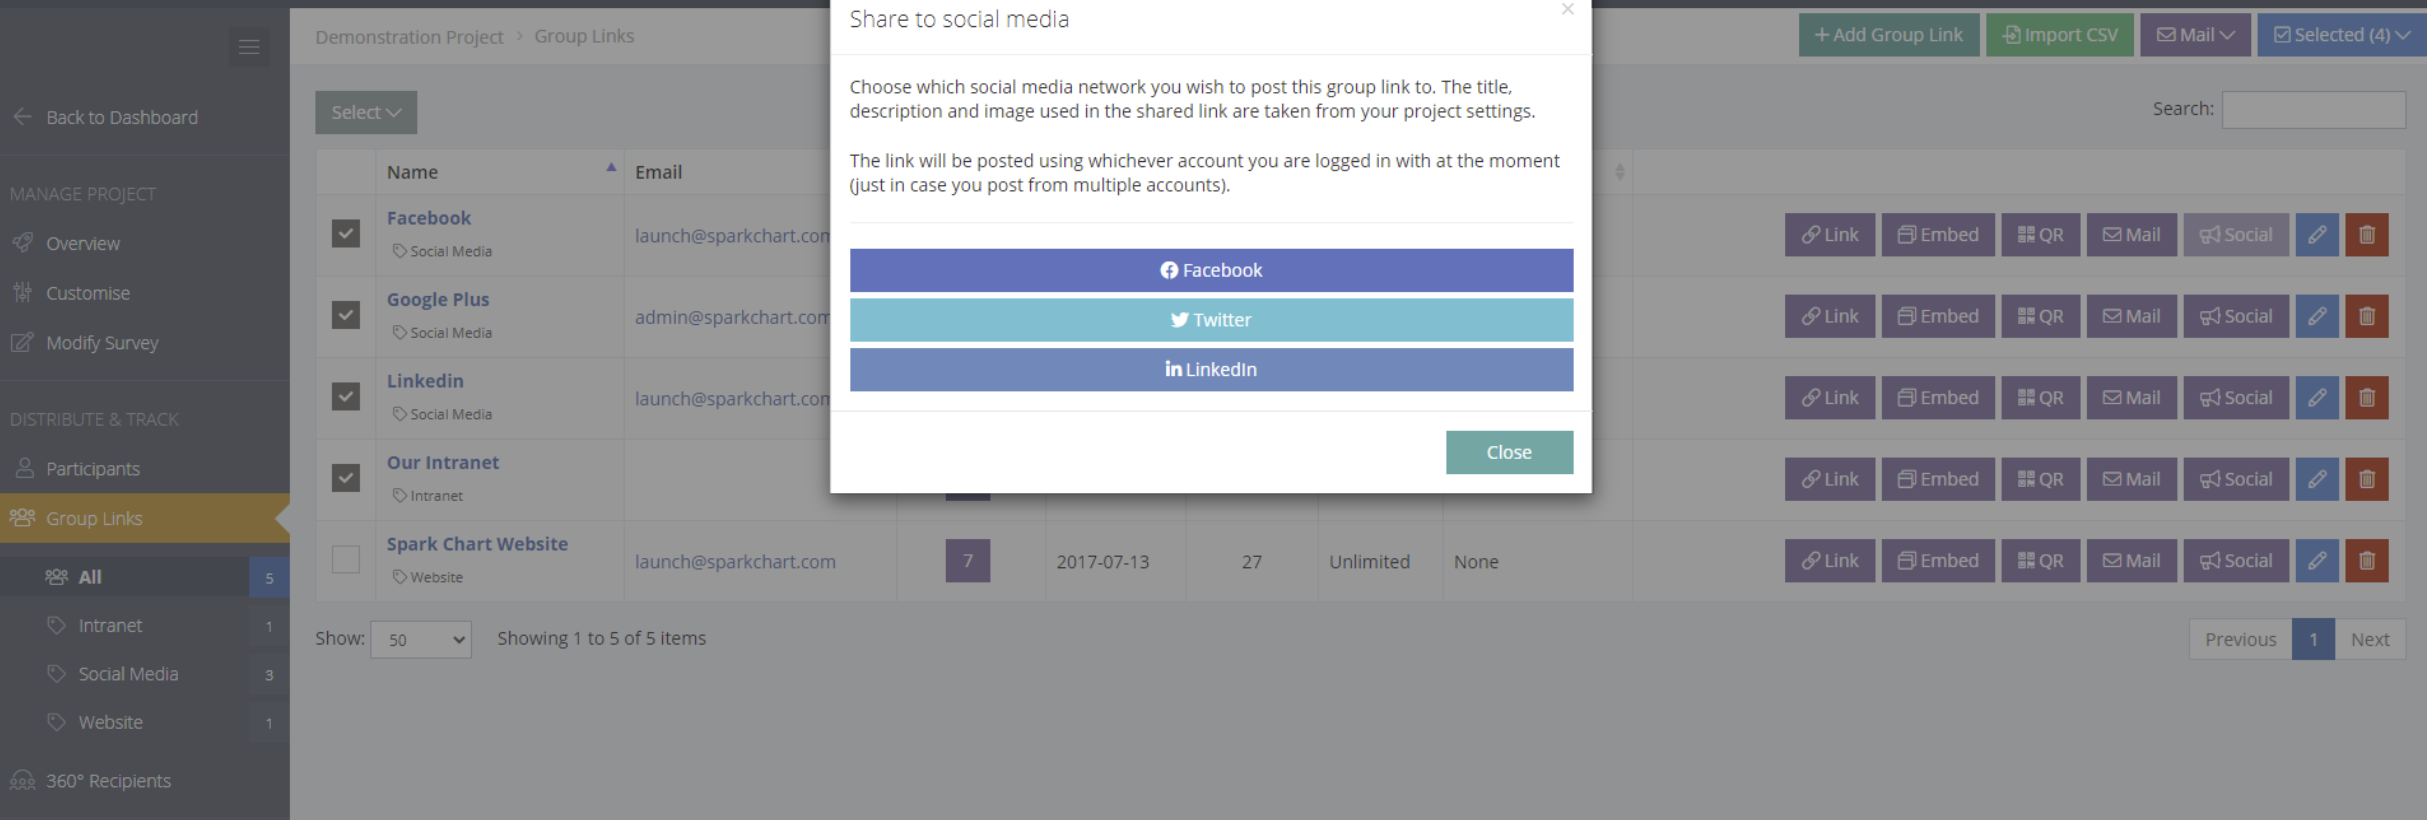
Share on Social Media
To share Group Links to social media accounts, select the "Social" button from the Group Link list and choose the desired social media. Alternatively, copy the link and post to Social Media manually.
Group Links can be emailed
An email address can be added to a Group Link, allowing Group Links to be emailed with the account Mail system.
To email all Group Links, select the "Mail" button at the top of the page. To send email for selected Group Links, select the check box next to the link and then choose Mail/Selected. There is also an email icon alongside each Group Link.
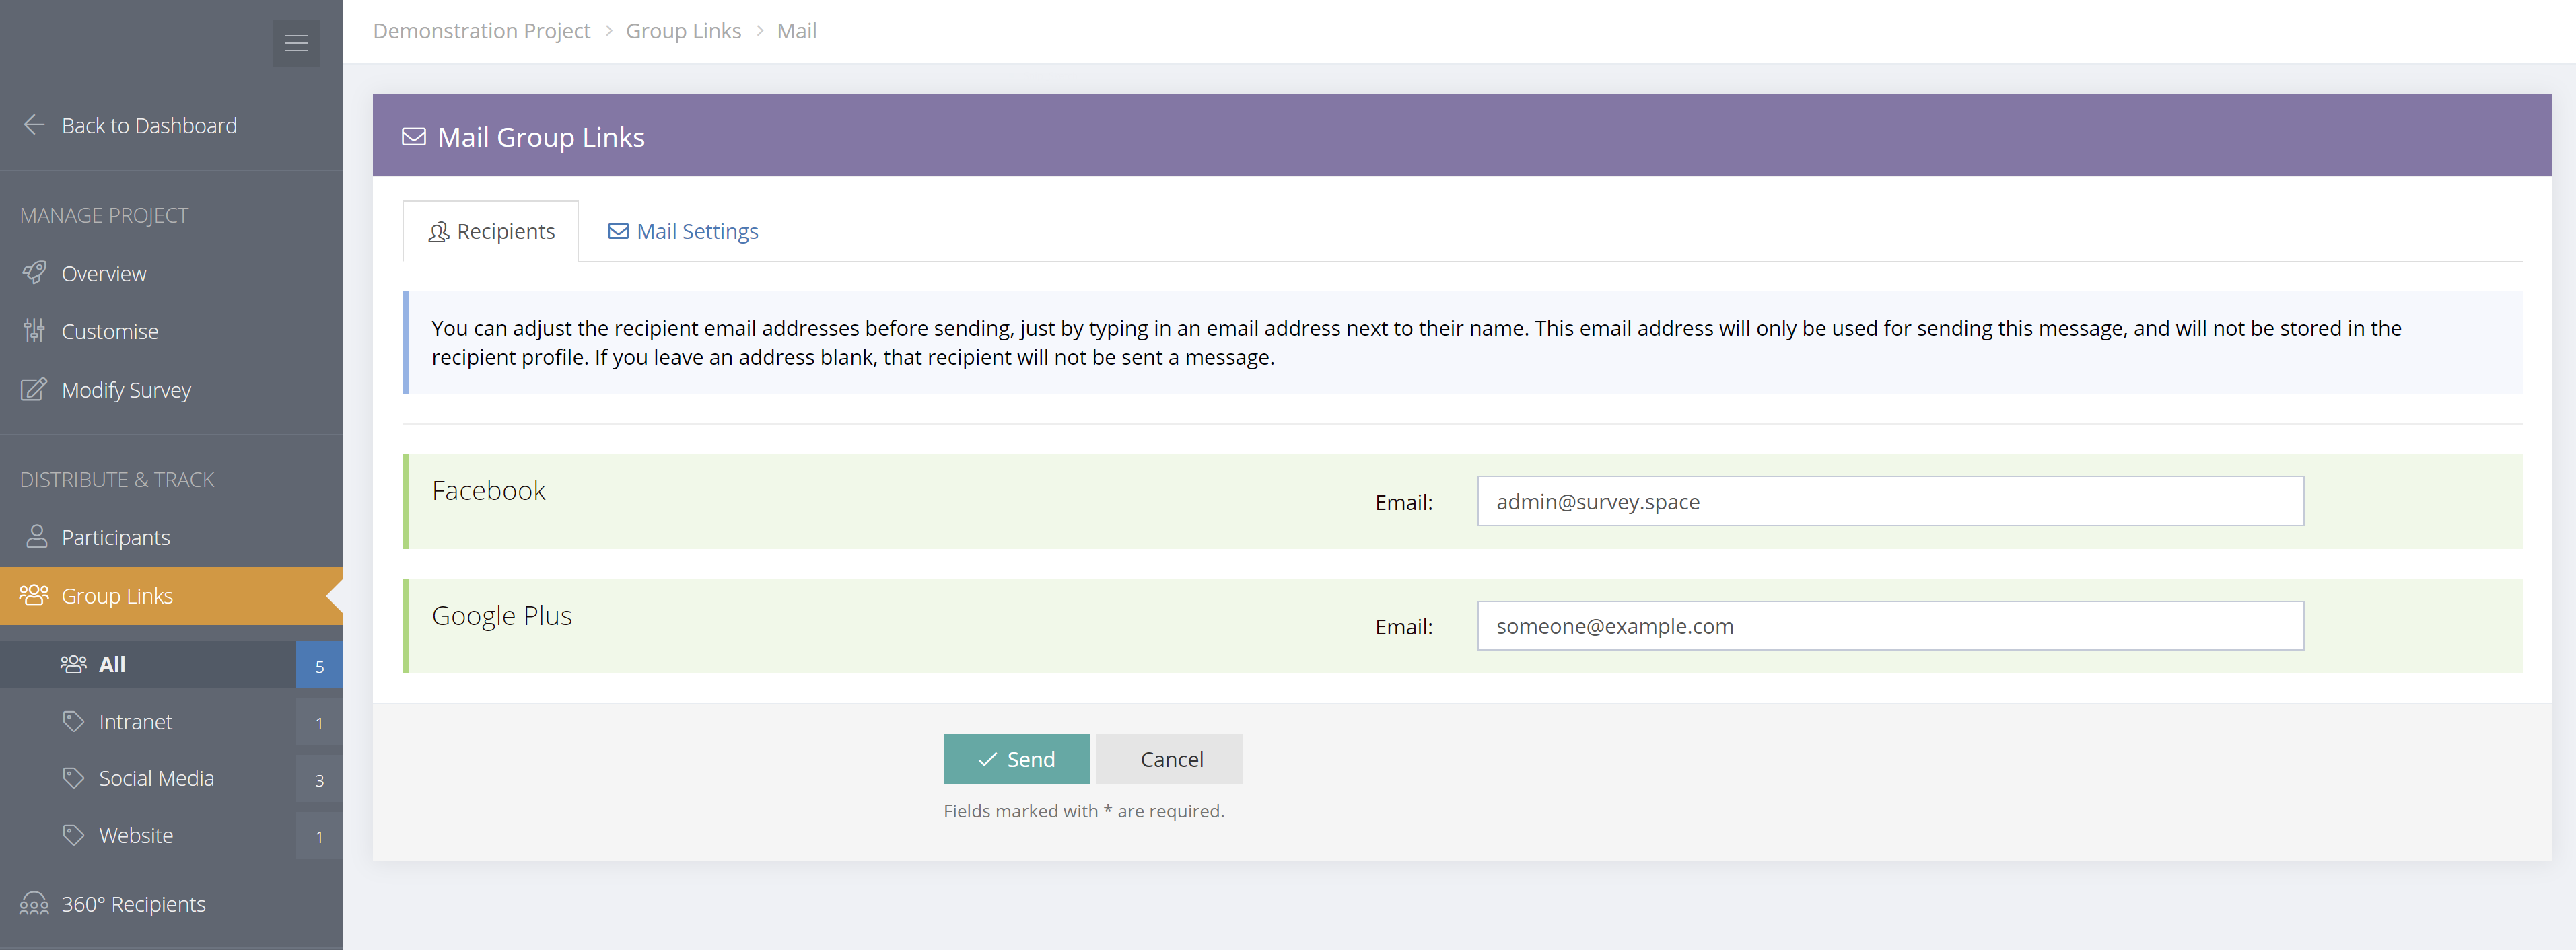
The Mail Window
The email window has two tabs - Recipients and Mail Settings.
Recipients
The Recipients window displays the Group Links to be sent emails and their email addresses.
Mail Settings
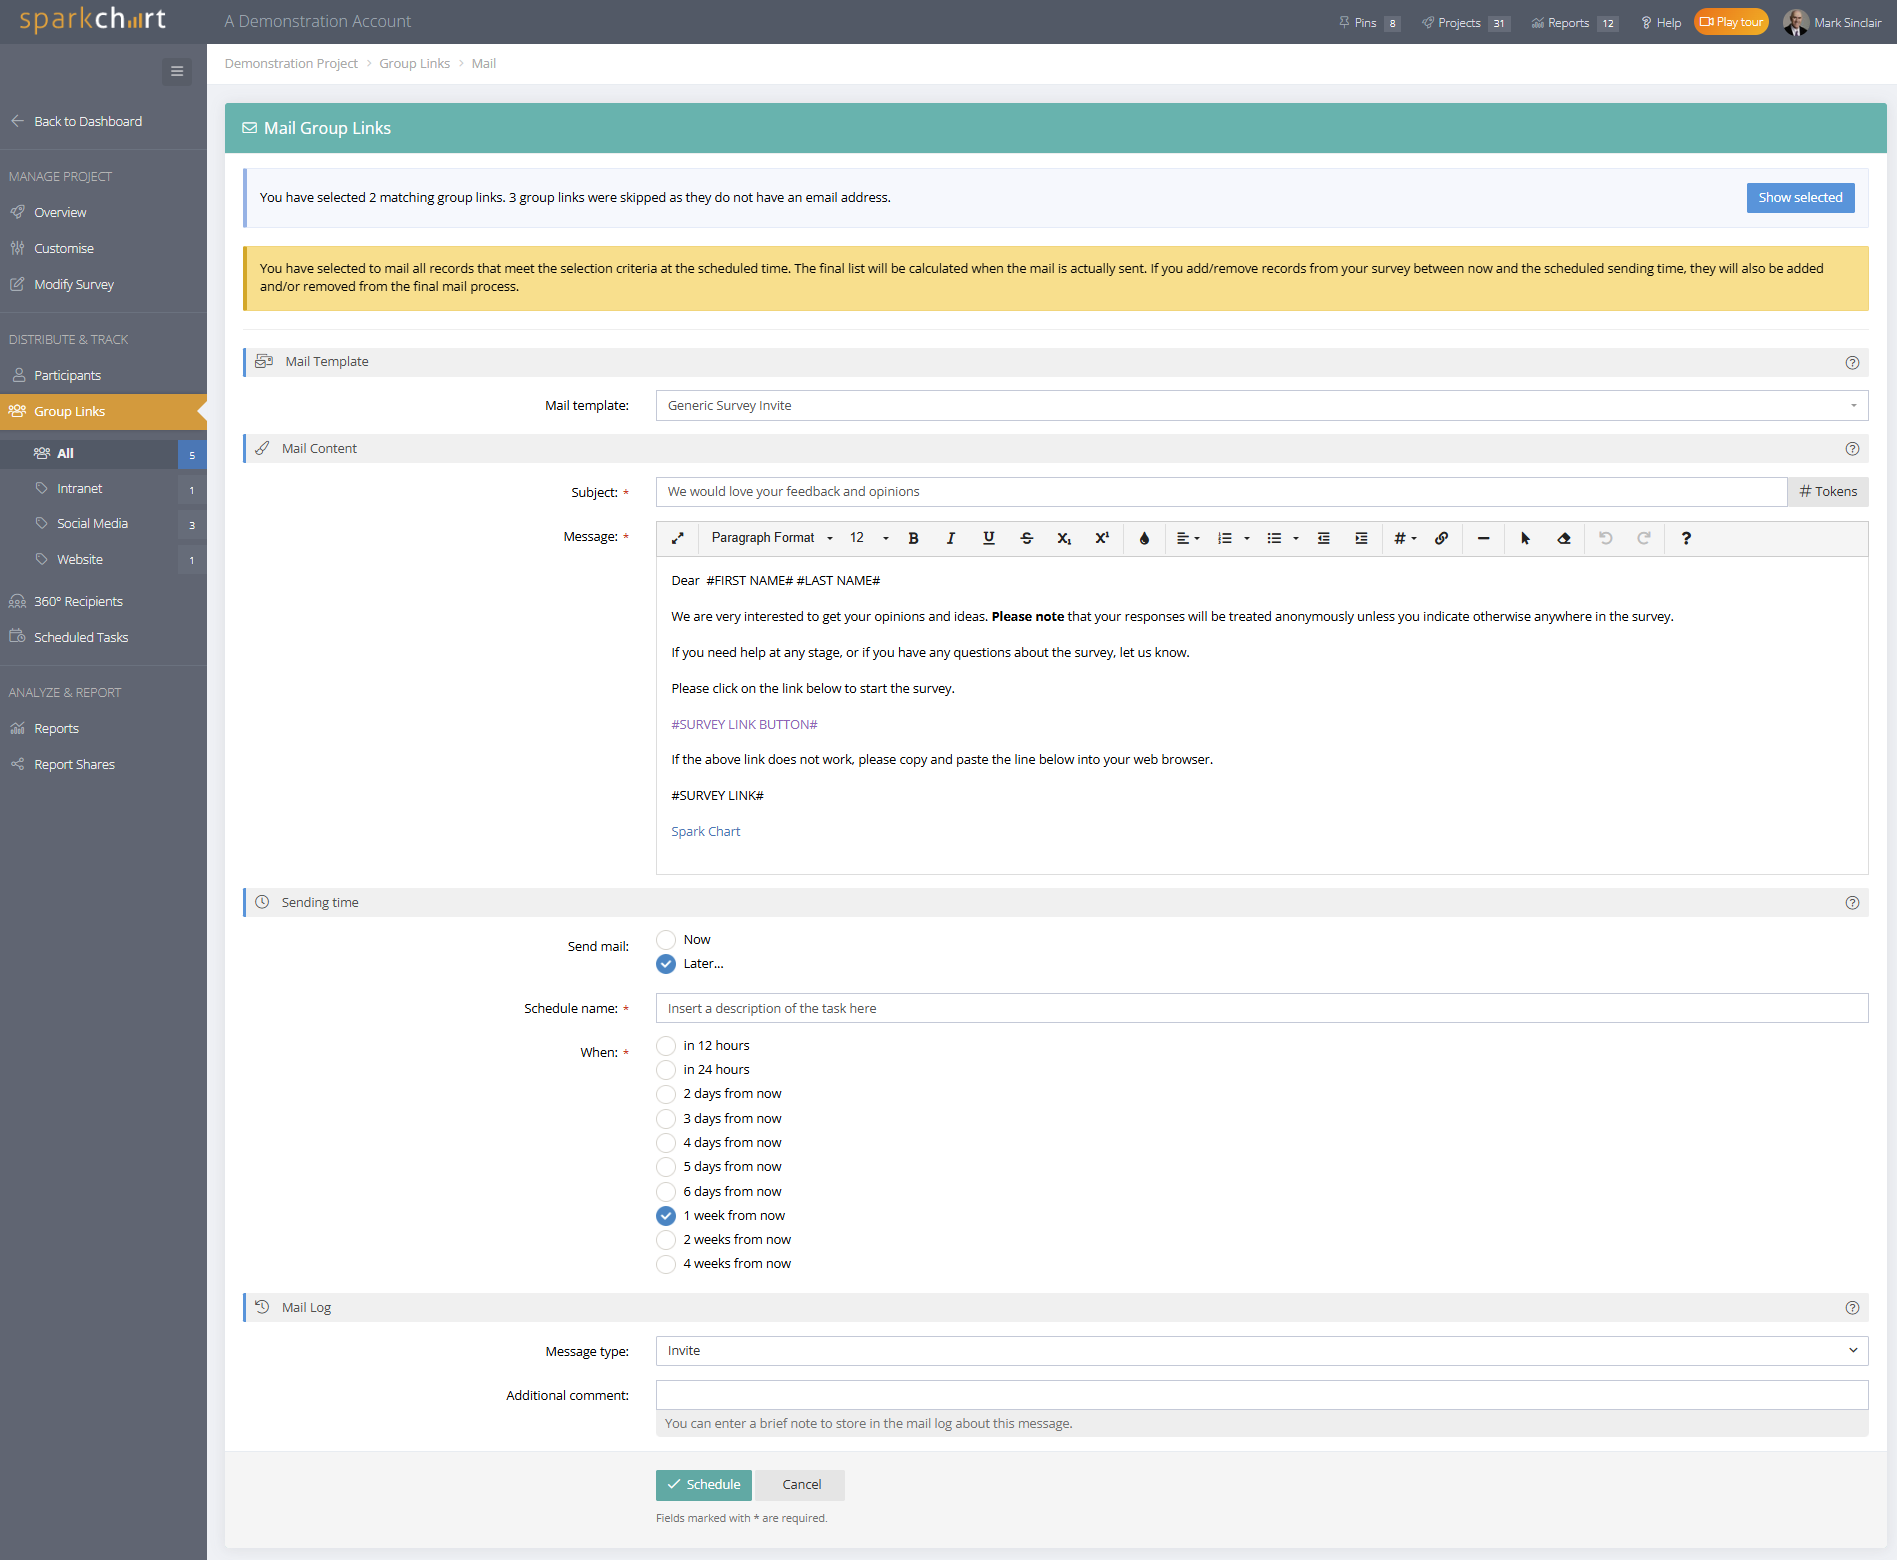
In Mail Settings select the Mail template to use. The Mail subject and message may be edited without affecting the Mail Template. Alternatively, create the email directly into the subject and message settings without using a Mail Template.
It is important to add relevant "Tokens" to the email. In particular, it is imperative to add a "Survey Button" token. This token will insert a button with a the link to the survey. Without this token the survey participants will not be able to access the survey.
A field is available to enter a "Mail log Comment". This comment will be recorded and can be viewed in the Mail History log for the Group Link.
Scheduling Automated Mail and Tasks
You can set mail to be sent immediately or at a future time. When scheduling mail for "Later" choose the timeframe and make a "Send to" selection. Mail will be sent to all selected records that meet the selection criteria at the scheduled time. The final list will be calculated when the mail is actually sent. If you add/remove records from your survey between now and the scheduled sending time, they will also be added and/or removed from the final mail process.
Note: The Timezone can be set for any region in your Profile > Accounts & Settings > User Interface menu.
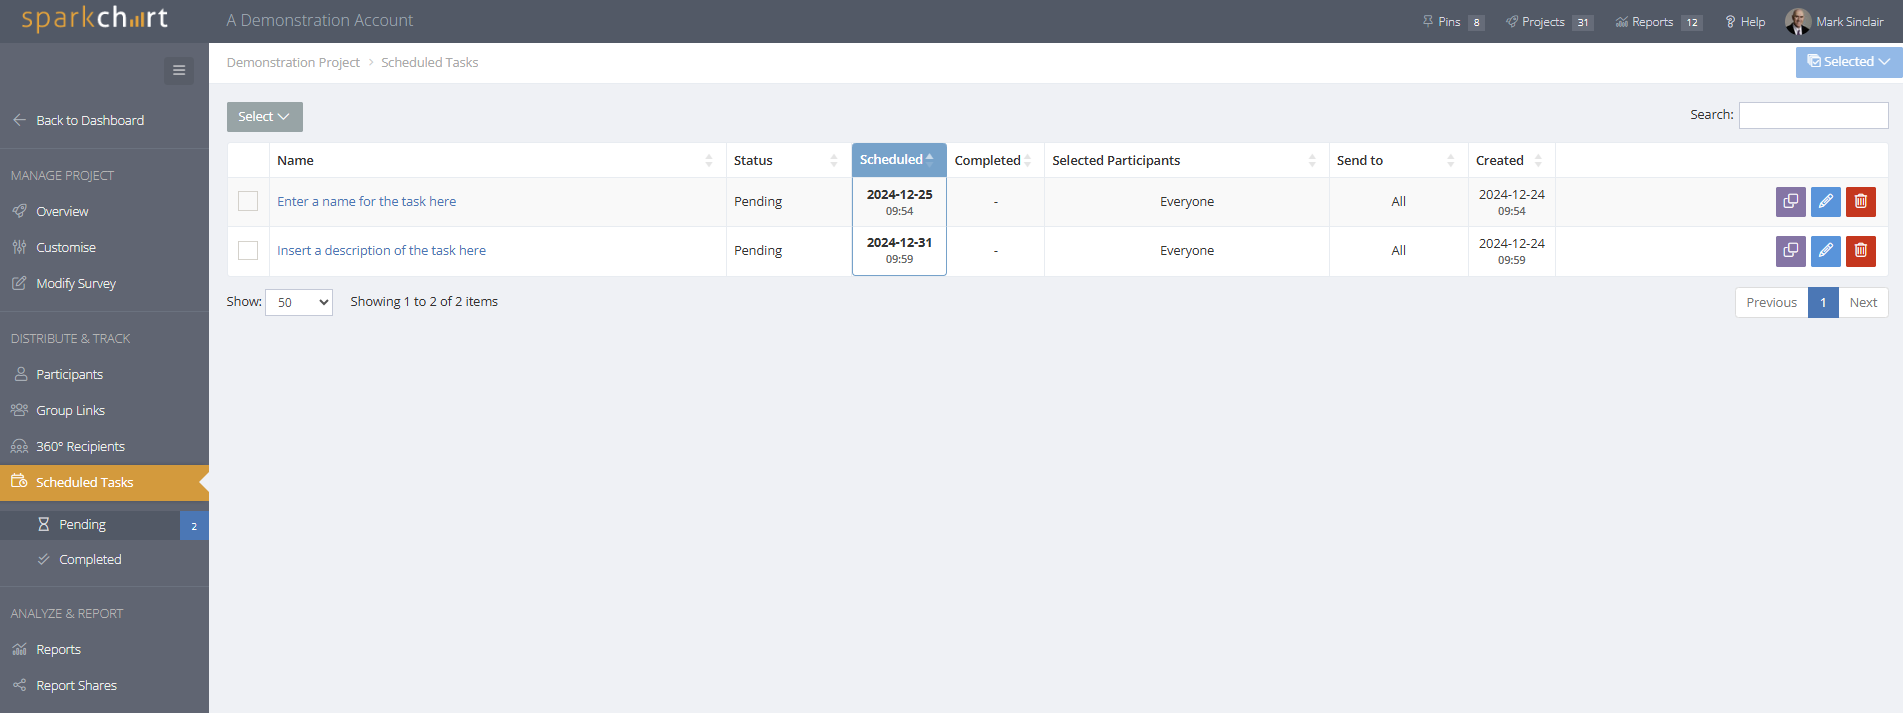
Viewing and Editing Scheduled Tasks
The Scheduled Tasks menu shows Pending and Completed tasks. Tasks can be edited up to a few minutes before the scheduled send time. Scheduled Tasks also appear in the Project Overview menu and on the Dashboard.
Deleting Group Links
After deleting a Group Link, the link will no longer allow people to register and complete the survey.
Deleting Group Links does not delete the participants who have registered from the link or their responses. Those participants will continue to appear in the list of project participants.
Optional URL Parameters for Deploying Group Links via Autoresponders, Mail Systems and Chat
Group links support three optional URL parameters. These parameters are easy to use in mass mail outs from mail systems or Autoresponders (e.g. Mailchimp, Aweber), or embedding in websites that include user authentication. This negates the need for users to register for the survey (as they have already logged into your site).
These Parameters are brought forward into the Participant List in the account.
There are 4 parameters that can be passed to the Group Link
- first_name
- last_name
- ext_uid
Examples
Let's look at some examples. As you have seen by now, a typical Group Link looks like this;
survey.sparkchart.com/start/abc123s/
If you don't have the registration option enabled, anyone who clicks the link will be added to your survey as an Anonymous User. Now let's look at the URL parameters;
survey.sparkchart.com/start/abc123s/?email=john@example.com
Anyone clicking that link will be registered into your survey with the listed email address, and this will be shown in your Participants list. If you want to use this feature, the only mandatory parameter is email, the others are optional. Now for another example;
survey.sparkchart.com/start/abc123s/?email=john@example.com&first_name=John&last_name=Smith
After clicking this link, John Smith will be in your participants list.
You may ask - what happens if I have a registration screen on my Group Link and I use this option? Simple - the registration screen will be pre-filled with those values, so the participant can verify them before starting the survey.
Usage
In case you have not used URL parameters before, the process is very simple. The format of the parameters and values is;
?email=john@example.com&first_name=John&last_name=Smith
Note that before the first parameter, you must use a ? symbol, and after that, each parameter is joined using a & symbol. The order of the parameters does not matter.
Once you have worked out your parameter list, simply add it to the end of the Group link.
User ID Parameter
The User ID paramater (?ext_uid=) can be useful for providing support where the ID can be appended. Support can then be provided based on individual responses to a survey. The ext_uid parameter is a way of integrating data with other systems, when you want to link a survey participant to a specific user in another application.
For those participants who have an external UID assigned, the ID will show below the name of the participant. In addition, you will see this field in the View Results screen for each participant, and it will also be included in the Report CSV Export.
First case example
Your accounting application assigns unique numbers to each of your clients (AB123, CD456, EF789 etc). You now want to set up a survey in Spark Chart that is emailed whenever a client pays their bill, but you don't want to have to ask them to fill in the registration form on the survey (see %link to registration forms info%). You create a Group Link in Spark Chart, and in the accounting app mail template, you pass some parameters identifying the client. Every application varies, but as an example it might look something like sparkchart.link/unique123survey456link/?ext_uid=%CLIENT-ID-HERE%
Your app sends out these links to the clients, and when they receive them and complete the survey, the client id supplied is saved with the Participant data in Spark Chart. Now you have an easy way of identifying the client in Spark Chart using the same client code as in your accounting app.
Second case example
You want to embed a survey on your site or support chat widget that a logged in user should only complete once. Since most applications will assign a visitor some form of unique id (usually a numeric or alphanumeric code), you follow the same procedure as above. Create a Group Link, then click the Embed button to generate the code needed to embed the survey in your site. Now add the ext_uid parameter to the embed code, passing it the parameter identifying the user that is generated by your site/application. For example, the final code might look like organisation <iframe height="500" width="500" src="sparkchart.link/start/unique123survey456link/?ext_uid=%CLIENT-ID-HERE%"></iframe>
When this code is active in your site, the visitor will see the survey and be able to complete it. Once finished, the survey will not appear any more, only displaying the finish page (you can configure this to optionally include a thank you message and display their responses).